Docker
What is Docker?
Docker is an open-source project that automates the deployment of applications inside software containers, by providing an additional layer of abstraction and automation of operating-system-level virtualization on Linux. In addition to the Docker container engine, there are other Docker tools that allow users to create complex applications (Docker-Compose) or to manage a cluster of Docker containers (Docker Swarm).
COMPSs supports running a distributed application in a Docker Swarm cluster.
Requirements
In order to use COMPSs with Docker, some requirements must be fulfilled:
Have Docker and Docker-Compose installed in your local machine.
Have an available Docker Swarm cluster and its Swarm manager ip and port to access it remotely.
A Dockerhub account. Dockerhub is an online repository for Docker images. We don’t currently support another sharing method besides uploading to Dockerhub, so you will need to create a personal account. This has the advantage that it takes very little time either upload or download the needed images, since it will reuse the existing layers of previous images (for example the COMPSs base image).
Execution in Docker
The runcompss-docker execution workflow uses Docker-Compose, which is in charge of spawning the different application containers into the Docker Swarm manager. Then the Docker Swarm manager schedules the containers to the nodes and the application starts running. The COMPSs master and workers will run in the nodes Docker Swarm decides. To see where the masters and workers are located in runtime, you can use:
$ docker -H '<swarm_manager_ip:swarm_port>' ps -a
The execution of an application using Docker containers with COMPSs consists of 2 steps:
Execution step 1: Creation of the application image
The very first step to execute a COMPSs application in Docker is creating your application Docker image.
This must be done only once for every new application, and then you can run it as many times as needed. If the application is updated for whatever reason, this step must be done again to create and share the updated image.
In order to do this, you must use the compss_docker_gen_image tool, which is available in the standard COMPSs application. This tool is the responsible of taking your application, create the needed image, and upload it to Dockerhub to share it.
The image is created injecting your application into a COMPSs base image. This base image is available in Dockerhub. In case you need it, you can pull it using the following command:
$ docker pull compss/compss
The compss_docker_gen_image script receives 2 parameters:
- --c, --context-dir
Specifies the context directory path of the application. This path MUST BE ABSOLUTE, not relative. The context directory is a local directory that must contain the needed binaries and input files of the app (if any). In its simplest case, it will contain the executable file (a .jar for example). Keep the context-directory as lightest as possible.
For example: –context-dir=’/home/compss-user/my-app-dir’ (where ’my-app-dir’ contains ’app.jar’, ’data1.dat’ and ’data2.csv’). For more details, this context directory will be recursively copied into a COMPSs base image. Specifically, it will create all the path down to the context directory inside the image.
- --image-name
Specifies a name for the created image. It MUST have this format: ’DOCKERHUB-USERNAME/image-name’. The DOCKERHUB_USERNAME must be the username of your personal Dockerhub account. The image_name can be whatever you want, and will be used as the identifier for the image in Dockerhub. This name will be the one you will use to execute the application in Docker. For example, if my Dockerhub username is john123 and I want my image to be named “my-image-app”:
--image-name=“john123/my-image-app”.As stated before, this is needed to share your container application image with the nodes that need it. Image tags are also supported (for example “john123/my-image-app:1.23).
Important
After creating the image, be sure to write down the absolute
context-directory and the absolute classpath (the absolute path to the
executable jar). You will need it to run the application using
runcompss-docker. In addition, if you plan on distributing the
application, you can use the Dockerhub image’s information tab to
write them, so the application users can retrieve them.
Execution step 2: Run the application
To execute COMPSs in a Docker Swarm cluster, you must use the
runcompss-docker command, instead of runcompss.
The command runcompss-docker has some additional arguments
that will be needed by COMPSs to run your application in a distributed
Docker Swarm cluster environment. The rest of typical arguments
(classpath for example) will be delegated to runcompss command.
These additional arguments must go before the typical runcompss arguments. The runcompss-docker additional arguments are:
- --w, --worker-containers
Specifies the number of worker containers the app will execute on. One more container will be created to host the master. If you have enough nodes in the Swarm cluster, each container will be executed by one node. This is the default schedule strategy used by Swarm. For example:
--worker-containers=3- --s, --swarm-manager
Specifies the Swarm manager ip and port (format: ip:port). For example:
--swarm-manager=’129.114.108.8:4000’- --i, --image-name
Specify the image name of the application image in Dockerhub. Remember you must generate this with compss_docker_gen_image Remember as well that the format must be: ’DOCKERHUB_USERNAME/APP_IMAGE_NAME:TAG’ (the :TAG is optional). For example:
--image-name=’john123/my-compss-application:1.9’- --c, --context-dir
Specifies the context directory of the app. It must be specified by the application image provider. For example:
--context-dir=’/home/compss-user/my-app-context-dir’
As optional arguments:
- --c-cpu-units
Specifies the number of cpu units used by each container (default value is 4). For example:
*--c-cpu-units:=16- --c-memory
Specifies the physical memory used by each container in GB (default value is 8 GB). For example, in this case, each container would use as maximum 32 GB of physical memory:
--c-memory=32
Here is the format you must use with runcompss-docker command:
$ runcompss-docker --worker-containers=N \
                   --swarm-manager='<ip>:<port>' \
                   --image-name='DOCKERHUB_USERNAME/image_name' \
                   --context-dir='CTX_DIR' \
                   [rest of classic runcompss args]
Or alternatively, in its shortest form:
$ runcompss-docker --w=N --s='<ip>:<port>' --i='DOCKERHUB_USERNAME/image_name' --c='CTX_DIR' \
                   [rest of classic runcompss args]
Execution with TLS
If your cluster uses TLS or has been created using Docker-Machine, you will have to export two environment variables before using runcompss-docker:
On one hand, DOCKER_TLS_VERIFY environment variable will tell Docker that you are using TLS:
export DOCKER_TLS_VERIFY="1"
On the other hand, DOCKER_CERT_PATH variable will tell Docker where to find your TLS certificates. As an example:
export DOCKER_CERT_PATH="/home/compss-user/.docker/machine/machines/my-manager-node"
In case you have created your cluster using docker-machine, in order to know what your DOCKER_CERT_PATH is, you can use this command:
$ docker-machine env my-swarm-manager-node-name | grep DOCKER_CERT_PATH
In which swarm-manager-node-name must be changed by the name
docker-machine has assigned to your swarm manager node.
With these environment variables set, you are ready to use
runcompss-docker in a cluster using TLS.
Execution results
The execution results will be retrieved from the master container of your application.
If your context-directory name is ’matmul’, then your results will be saved in the ’matmul-results’ directory, which will be located in the same directory you executed runcompss-docker on.
Inside the ’matmul-results’ directory you will have:
A folder named ’matmul’ with all the result files that were in the same directory as the executable when the application execution ended. More precisely, this will contain the context-directory state right after finishing your application execution. Additionally, and for more advanced debug purposes, you will have some intermediate files created by runcompss-docker (Dockerfile, project.xml, resources.xml), in case you want to check for more complex errors or details.
A folder named ’debug’, which (in case you used the runcompss debug option (-d)), will contain the ’.COMPSs’ directory, which contains another directory in which there are the typical debug files runtime.log, jobs, etc. Remember .COMPSs is a hidden directory, take this into account if you do ls inside the debug directory (add the -a option).
To make it simpler, we provide a tree visualization of an example of what your directories should look like after the execution. In this case we executed the Matmul example application that we provide you:
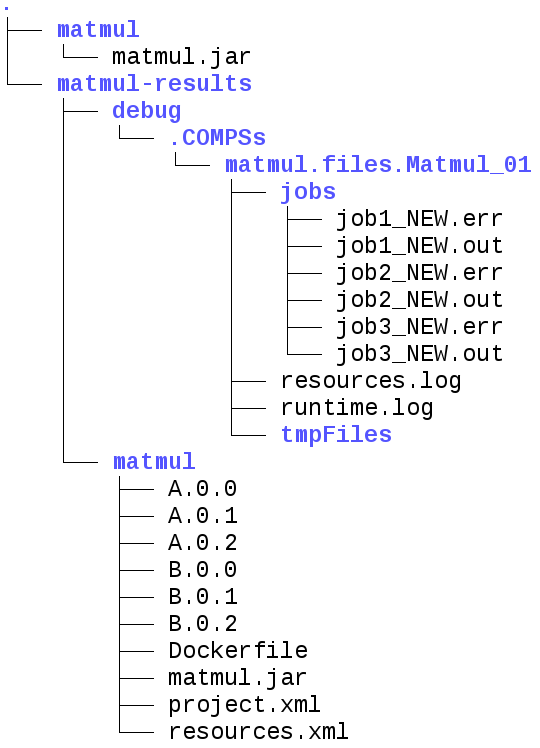
Figure 25 Result and log folders of a Matmul execution with COMPSs and Docker
Execution examples
Next we will use the Matmul application as an example of a Java application running with COMPSs and Docker.
Imagine we have our Matmul application in /home/john/matmul and
inside the matmul directory we only have the file matmul.jar.
We have created a Dockerhub account with username ’john123’.
The first step will be creating the image:
$ compss_docker_gen_image --context-dir='/home/john/matmul' \
                          --image-name='john123/matmul-example'
Now, we write down the context-dir (/home/john/matmul) and the
classpath (/home/john/matmul/matmul.jar). We do this because they will be
needed for future executions.
Since the image is created and uploaded, we won’t need to do this step
anymore.
Now we are going to execute our Matmul application in a Docker cluster.
Take as assumptions:
We will use 5 worker docker containers.
The swarm-manager ip will be 129.114.108.8, with the Swarm manager listening to the port 4000.
We will use debug (-d).
Finally, as we would do with the typical runcompss, we specify the main class name and its parameters (16 and 4 in this case).
In addition, we know from the former step that the image name is
john123/matmul-example, the context directory is
/home/john/matmul, and the classpath is
/home/john/matmul/matmul.jar. And this is how you would run
runcompss-docker:
$ runcompss-docker --worker-containers=5 \
                   --swarm-manager='129.114.108.8:4000' \
                   --context-dir='/home/john/matmul' \
                   --image-name='john123/matmul-example' \
                   --classpath=/home/john/matmul/matmul.jar \
                   -d \
                   matmul.objects.Matmul 16 4
Here we show another example using the short arguments form, with the KMeans example application, that is also provided as an example COMPSs application to you:
First step, create the image once:
$ compss_docker_gen_image --context-dir='/home/laura/apps/kmeans' \
                          --image-name='laura-67/my-kmeans'
And now execute with 30 worker containers, and Swarm located in ’110.3.14.159:26535’.
$ runcompss-docker --w=30 \
                   --s='110.3.14.159:26535' \
                   --c='/home/laura/apps/kmeans' \
                   --image-name='laura-67/my-kmeans' \
                   --classpath=/home/laura/apps/kmeans/kmeans.jar \
                   kmeans.KMeans